For you that have Xperia U i have good news for you. Now you can root xpeia u without unlock bootloader so it means you will not void the warranty. That is such a interisting guide right? Ok but before we start the tutorial you must read all and make sure you did the step by step insrtuction correctly so you will success root you phone.Android is good
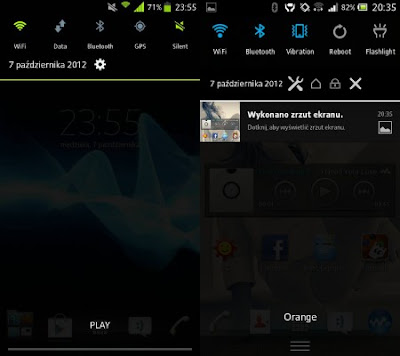
This root tutorial is for Xperia U user that have upgraded to android Ice Cream Sandwich ROM. I know that there are many xperia u user that still confuse and try seacrh for the tutorial in the internet but hard to find the instruction that complete, easy, and without unlock bootloader to understand. So to solve those problem i make this tutorial based with my experience when i help my friend to root xperia u on ics. Also, after obtaining the ROOT, we will see how to customize the notifications bar to the Xperia U by adding useful toggle to change the system settings on the fly.
Point out, before we begin, that driving with the QuickPanel runs not only on Xperia U, but also on Xperia Sun, P and possibly S (I haven't try to test unfortunately).Ok now lets start the tutorial
How To Root Sony Xperia U Ice Cream Sandwich Without Unlock Bootloader
below is the explanation. please read completely and so that you will success with the process, and once again i tell you if this tutorial don't need to unlock the bootloader so will not void your phone warranty.
- Download this zip file and unzip it.
- Run the program "runme.bat."
- Press 1 and sent
- With the phone turned on attach it to the computer via USB.
- The program will start a script, which will tell you to unlock your phone. Do so and you'll find yourself in the APA backup and recovery. Select "RootMe" and click restore.
- Wait for it to finish and do not touch anything, the phone will restart. Once you have turned on the App SuperSU installed and Permissions Root.
- Make sure to select the file "RootMe" at APA backup and recovery, and careful that the phone is switched on.
- Finish. Now you have successfully Root Sony Xperia U, and you can fully customize your android smartphone.
After you have the successfully get the root acces, below i share guide to customize the notifications bar by adding useful toggle to change the system settings on the fly.
I advise you, however, to also follow the guide found below. It 's really very interesting and useful.
Thanks to XDA we have two very easy ways to get the most comfortable Toggles in pull-down notifications. Thanks to the toggles in the notification bar you can change on the fly the main system settings without having to open each time the dedicated menu.
Requirements
your phone is on ICS firmware
have super user acces / root
A file manager (eg Root Explorer, ES File Manager) that allows you to manage the system folders
How to customize notification bar on Xperia U
- Download this file, put it in the memory of your phone and unzip it.
- It will come out two files: quickpanelsettings.apk and sistemUI.apk (or something like that). Move them both in the / system / app and set the permissions: rw-rr.
- Reboot.
After finished the installation you need to restart your phone, because if you not restart it first Sistem UI will crash continuously.
So now What do you think now of your "new" rooted Sony Xperia U Android Phone ?


0 comments:
Post a Comment